PRINT FILE SETUP GUIDE | EASY PRINT-READY HELP – WILD OX PRESS
File setup help made easy. If you’re unsure about your print files or run into setup issues, our team is here to help every step of the way. Just let us know, and we’ll review your files carefully to make sure everything is print-ready. Whenever possible, we’ll fix small problems on our end—saving you time and making the process simple. Call us at 260-749-2288 or email info@wildoxpress.com with your files, and we can provide a quote and walk you through the process from there. Our goal is to give you a smooth, stress-free printing experience with high-quality results, without all the back-and-forth.
BLEEDS, SAFE ZONES AND CROP MARKS

BLEEDS
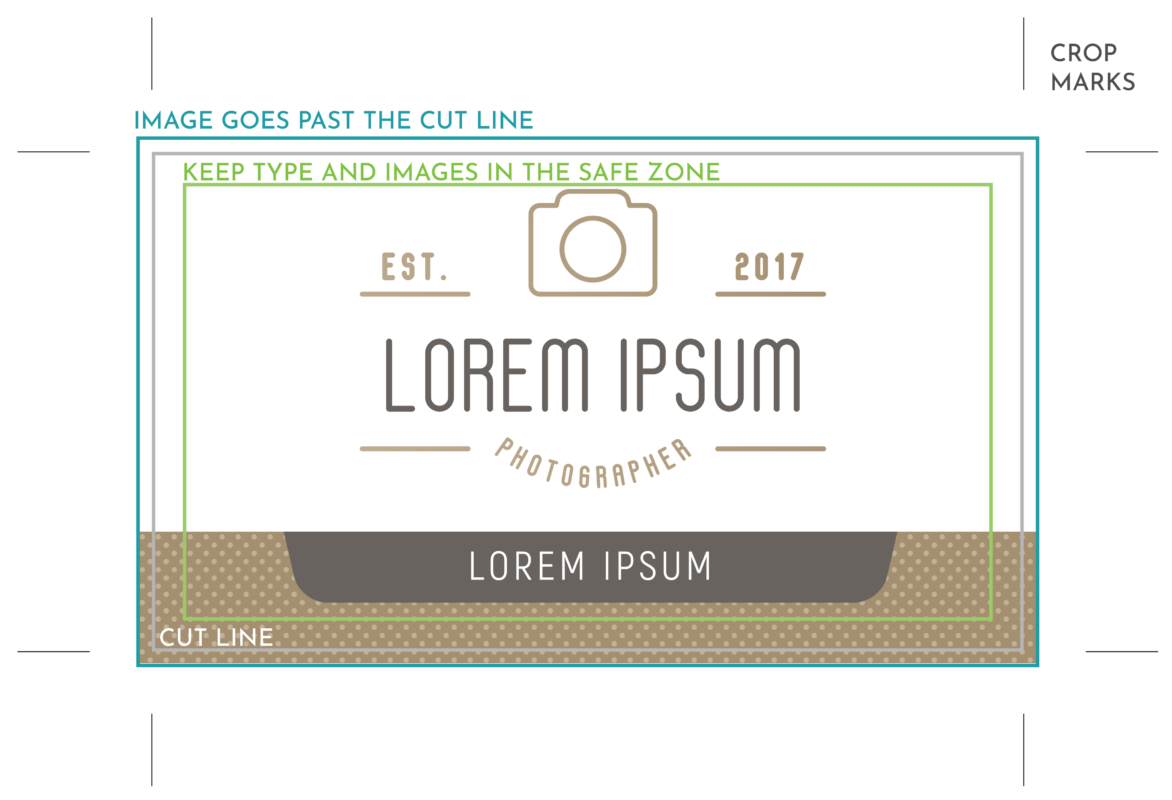
Bleeds are when the image goes past the cut line. Even with all the precision that we have, there is always natural changes in the paper that happens from process to process. Paper naturally shrinks and expands disproportionately making each process slightly off from the intention. If there was no bleed on the bottom portion of the image above, we would see a white line on the left or right and possibly the bottom.
MOST ITEMS
Most pieces need at least .0625″ extra on each side. If you add more that is great too.
BOOKLETS AND SIGNS
Booklets and signs require more bleed than most items. We recommend at least .25″ on each side.
SAFE ZONE
For the same reasoning as the bleeds, It is very important to keep text away from the edges. Even if the text does not get cut off, it looks very unprofessional.
MOST ITEMS
Most Items need about .125″ of safe area. Other then business cards, having larger margins like .375″ always looks cleaner and more professional.
BOOKLETS
Booklets need at least .25″ margins. We believe anything less than .375″ looks crowded.
SIGNS AND BANNERS
Signs and Banners can vary based on size. Really small signs, at least .25″ safe zone. Large signs and banners, 2-3″ would be best.
CROP MARKS
Crop marks show us where you intend the cut line to be. This just helps us with clarity for your project.
FILE TYPES AND COLOR
PDFs are generally the best file format but we except all sorts of files such as Illustrator, Indesign, Jpgs, eps, etc. Usually, any Microsoft file formats are not best but we would work with you on them if we can.
Always save all files as CMYK. If you have any spot colors, convert them to CMYK. If you don’t know what a spot color is, don’t worry. It’s unlikely there are in the document. We can always help in this area if you need us.
Convert all fonts to outlines if you send us an illustrator file or eps or include the fonts with the file. Most of the time this is not an issue if they are saved as pdfs.
SAVING PRINT FILES FROM CANVA
For the best print results in Canva, we recommend turning on bleeds so you can see where your artwork extends past the trim edge. Simply go to File > Settings > View Bleeds to check your design. When you’re ready to save, download your file as a PDF with crop marks and bleed to ensure nothing important gets cut off. If Canva gives you the option, choose CMYK PDF for accurate print colors—otherwise, RGB PDF works fine too.


